Last year I wrote about how I had written an ESPHome configuration for the Seeed Studio reTerminal E1002 device to work as a small, color, digital art frame. This year, I wrote about how I had been using Claude Code to help me write Home Assistant code for myself. Those efforts have now combined in a rework of my E1002 configuration to make it suitable for the Seeed Studio reTerminal E1003.
The reTerminal E1003 caught my eye because it contains a very interesting e-paper panel: instead of the fast panels that can do only black/white or the slow panels that can do only 6 colors, this one has a very fast, high-resolution, grayscale e-paper panel. At 1872 by 1404 pixels with a 10.3″ diagonal, this panel clocks in at a fine 227 DPI, and is able to display 16 grayscale shades instead of just pure black or white. You can even buy it bundled with a black frame! These factors combine to create a display that can convincingly reproduce a classic black and white photograph, without giving any indication that it’s a display.

In fact, my E1003 is hanging in our apartment’s hallway and has already managed to convince multiple guests into thinking it was an actual photo print – only for them to be surprised when the photo had changed when they walked back out! I think this is the closest we’ve come so far to having a digital frame that can pass for the real thing.
Update (June 6, 2026): I’ve changed the dithering guide to use my own dithering solution, OpenDithering. Try it, or read more about the creation of this tool.
Update 2 (June 8, 2026): Some great investigative work by ar0v3r revealed that the SD-card and touch controllers of the E1003 were still drawing power during deep sleep. I’ve pulled in their finding and with my newest config, updated on GitHub, those are kept powered down. This has halved power consumption during deep sleep!
Getting Claude to help

At first I thought I could simply change an identifier to have my E1002 config work with an E1003, but it turns out that ESPHome does not yet support the display in the E1003 (it is being worked on though). While I was looking for help, I did discover Adam Conway of XDA Developers had managed to get a working configuration, but I could not quite get his setup to work for grayscale images. Finding myself at the limits of my own capabilities, I set Claude Code to work. I gave it my E1002 YAML, the external component Adam had been using, and the datasheets of all the relevant hardware inside of the E1003. And within a few hours of experimenting and debugging, it built me a working component for the E1003’s display!
Once I got the basics working, I started using Claude to improve it, adding new features and fixing old bugs from my E1002 version. It still has roughly the same setup and layout as the config I originally wrote last year, but a lot has really changed since. Now, I get why people are uncomfortable installing vibe-coded software, and I make a point of making it very clear when something I put online was written (mostly) by AI. But honestly, I’m a marketer, not a developer, so if you dared install the code I used to write myself – you were probably running a much greater risk. As always, YMMV, but my E1003 config is on GitHub if you want to give it a whirl:
How it works
The flow of the device is simple: wake up, show a random new image, go back to sleep. But the details of how that happens are worth unpacking. Like the E1002 config I created before, this uses the ESP32’s deep sleep function, a hardware state where almost everything is powered off, draining the battery as little as possible. It spends most of the time in this sleep state.
Once the E1003 wakes up and WiFi connects, three things happen: the temperature sensor takes a reading (used to adjust the e-paper controller, as the e-paper’s temperature influences the contrast of the image shown), the battery is measured and sent to Home Assistant, and the image selection logic runs to pick the next image. The temperature and battery readings are quick; the image download and processing is the slow part. When that processing finishes, the display refreshes (compared to the standard black/white or color panels, this is SO fast), and the device immediately goes to sleep again. There’s no waiting around to waste battery, no readings taken that aren’t needed.
The device sleeps until the next full time interval you set up, so if you set a 1-hour interval between image changes it will calculate how long to sleep to hit the next full hour. You can also set an active-hours window (say, 07:00 to 23:00) and any time outside that window gets skipped. The display probably doesn’t need to waste power changing the image at 3 in the morning.

Deep sleep itself is enabled by a Home Assistant input boolean. When that boolean is off, the device stays awake after each image, which is useful for setup, or for using the device manually. If you want to wake up the E1003 outside of the normal interval, you can use the green button. The two white buttons step forward and backward through images sequentially. From Home Assistant you can also jump to a specific image number, trigger a random image, or step forward and backward using buttons exposed in the device card. But without deep sleep, the battery only last for a day.
Since June 8, I’ve updated my config to include ar0v3r‘s findings on optimizing the deep sleep of the E1003. It turns out that by default, even in deep sleep, the SD-card controller and the touchscreen controller remained turned on. By making sure those are powered down, they managed to reduce power consumption of the E1003 immensely while sleeping. As this photo frame sleeps most of the time, that leads to immense savings. I’ve tested two E1003 frames, one with my original config and one with the updated config, alongside each other and the results definitely speak for themselves:
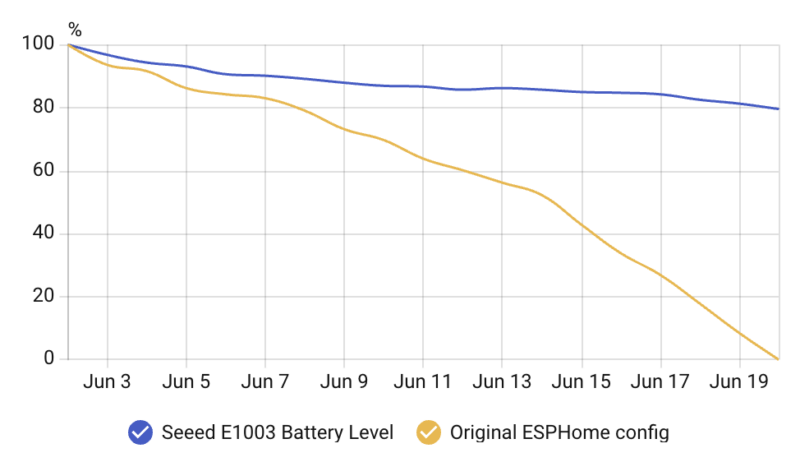
Image selection
On the E1002 my approach to cycling through images was purely random: each wake, just pick any image from those uploaded to the Home Assistant www folder. That works fine, but especially with short update intervals you could potentially see the same images several times in a row. Claude suggested using a history buffer instead. It lives in a special region of RAM that survives the device going into deep sleep. That means the device remembers which images were shown across sleep cycles without needing to write anything to flash. The logic is: before picking a random image, check the recent history – roughly the last half of your total collection, capped at 50 entries. If an image has been shown recently, find another random image. This gives a reasonable guarantee that you’ll not see repeats very often.
These upgrades from the E1002 seem like little things, but they do make this feel like a crafted product rather than a prototype. The images look photorealistic, it wakes only when it needs to, shows something new without repeating itself too often, and goes back to sleep without any intervention. The only times I interact with it are to add new images to the selection and charge it every once in a while. Maybe I’ll adjust the active hours in winter when I want it to stop earlier. Beyond that, it just hangs on the wall!

Making it look good
There are two caveats that are important for every e-paper frame:
1. it’s not a backlit screen, which means it looks like a real photograph, which is exactly what we want. But it also means that you need to rely on external sources of illumination to see it. If the ambient light is poor where you intend to hang it, and it would be hard to see a real photo hanging there, it will be hard to see this e-paper display as well. You may want to get one of those art lights designed for lighting up paintings.
2. The panel can only produce a limited amount of different colors, in this case 16 shades of gray. Considering monochrome e-paper panels only do pure black or pure white, 16 shades is already way more to work with. But if you were to simply reduce the palette from a normal image to just 16 shades of gray, you’d get ugly results with tons of artifacts in your image. Instead, you need to use a process called dithering. The good thing about dithering is that 16 shades of gray are an enormous palette for it to work with, which means the end results do not have the pixelated look that color dithering on the E1002 model does.
This blog previously featured a guide on how to set up an online dithering tool to work with the E1003, but it was a slow and frustrating process. That’s why I vibecoded OpenDithering over a weekend, which is meant as an experimentation tool to find the optimal dithering algorithms and settings for e-paper displays. The new, much shorter, guide is as follows:
- Go to OpenDithering
- Select the Seeed reTerminal E1003 as your device preset
- Upload an image you want to convert
- Select the Grayscale preset
- Download your dithered PNG
- Optionally: Run the dithered PNGs through ImageOptim for lossless compression. This isn’t necessary, but ImageOptim can shave off half the size of the PNG which speeds up the download a bit more. Every tiny bit of battery saved helps!
The grayscale preset compresses your image’s dynamic range, ensuring that highlights don’t get blown out in the process, and sets the dithering algorithm to Dizzy. This very new algorithm (from 2024) is special because it doesn’t result in repeatings patterns or artifacts in the dithered image, the diffusion pattern instead looks more like a fine grain.

Alternative builds
I’m using Seeed’s bundle of the E1003 with an aluminium black frame, which feels quite premium and matches the black and white aesthetic of the images displayed very well. However, if you prefer other looks, there’s an easy option. My favorite frame for e-paper builds, the IKEA RÖDALM, comes in an appropriate size at 21 by 30 cm. For this build, I modeled a few spacers which let you easily keep the E1003 centered in place in the IKEA frame.
The stock matte is too small for the E1003, so I had to cut a custom matte to the right dimensions. There’s suitable vendors for this everywhere, but I used an online one here in the Netherlands.


Another alternative is to not buy the all-in-one E1003 device from Seeed Studio, but buy their separate panel, controller board, and optional battery. This means you have to house the whole setup yourself, but it does let you have full freedom. This way you’re not locked into any aspect ratio. The E1003 is a 4:3 screen, but very few ready-made frames match those dimensions so can end up looking unbalanced. Having a proper frame custom built and mounting the panel in by hand could lead to a better looking result.

Buying the panel and board without a battery also lets you run this straight from USB-C power, without having to worry about damage to the battery over time. If you have a different form factor in mind than a picture frame, or you’re going to be using this on a desk where you can easily hide a power cable, that might be preferable!
One last – and very interesting – alternative is to check out OpenDisplay. It’s a standard for e-paper displays that is supported by Home Assistant and can run over Bluetooth proxies. There are still some limitations to using OpenDisplay on the E1003 currently, which is why I’m running ESPHome in this build instead of OpenDisplay. But I strongly believe that OpenDisplay is going to be the future for e-paper displays in the Home Assistant ecosystem.
Their philosophy is to create firmware that is as power-efficient as possible, allowing battery-powered displays to last the longest. To do so, their firmware is optimized only for displaying an image. All the heavy lifting, when it comes to creating the dashboard image and postprocessing it using dithering and other algorithms, happens in the integration on the Home Assistant server, which has ample power to do so. Currently their firmwares for the NRF series chips are the most advanced, but I’m looking forward to seeing what they can do with the ESP chips as well.
[…] Dizzy (2024) is the one I was really interested in. It was invented by Liam Appelbe, and it’s getting some attention in the e-paper world right now, which is how I found out about it. Instead of a fixed order, it processes pixels randomly, shuffling through the entire image differently every time you run it. The visual result is quite different from classic algorithms: more even, more organic, and entirely without the Floyd-Steinberg-ish artifacts. On a grayscale image, this random pattern looks like the grain you would get in analog photos; quite pleasing! This is my favorite algorithm for images I want to use on my E1003 black and white photo frame. […]