My newest purchase was a bit of a gamble. I bought a $500 Phase One H20 digital back for my Hasselblad 500EL/M medium format camera. Or, simply put, I bought an expensive old gadget for my even older analog camera, making it a digital camera. A gadget that was released in the early ’00s and runs on the now mostly forgotten FireWire standard. Getting it to work on my modern Mac was a bit of a challenge!


It was worth it though. Check out these simple test shots I took of my girlfriend and a vintage watch and swipe to the 1080×1080 pixel crops – that’s a ton of detail the Phase One is capturing. The results you can get out of this back are still surprisingly good, even by current standards. If you want to use a Phase One H-series back (like the H5, H10, H101, H20, or H25) keep on reading and I’ll show you what worked for me. There are more sample pics for you to check near the bottom of this article!
UPDATE: Do NOT upgrade your MacOS to Big Sur or later if you are following this guide. Apple has removed proper FireWire support and plugging in your digital back will cause a kernel panic and crash your Mac. You will have to keep a device on MacOS Catalina to make use of these backs. This also means you will be unable to follow this guide if you have an M-based Mac, as they don’t support MacOS lower than Big Sur.
UPDATE 2: Do NOT upgrade your Capture One to 14.2.0 or later, as it has removed FireWire support as well. You will need to stay on version 14.1.1 (a table with additional details can be found here). From their release notes: “Apple and Microsoft have made updates to their architecture and we can no longer maintain firewire tethering support on ARM and Intel based computers from Capture One 21 (14.2.0).”
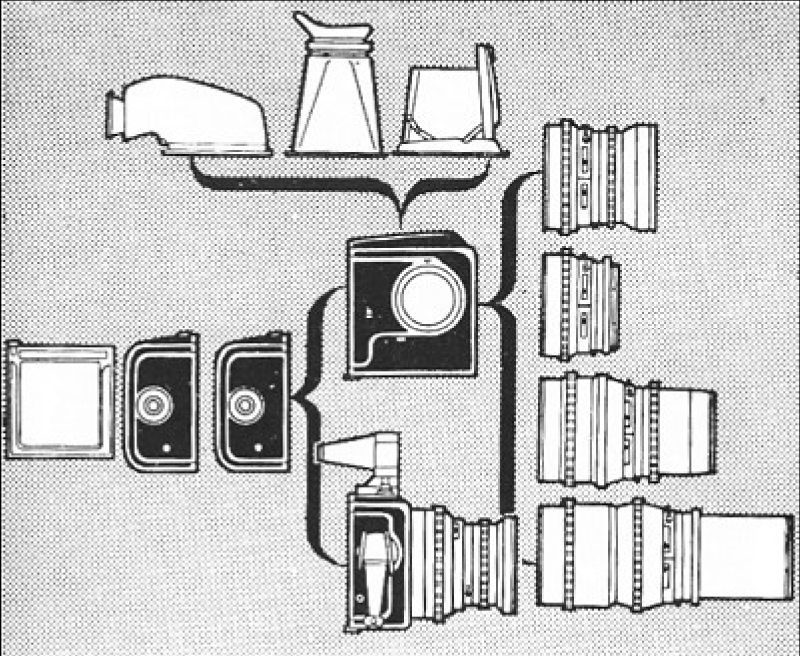
Film and digital backs
Let’s start at the beginning. Backs, in terms of analog photography, are the modular film magazines that mount onto the rear of professional cameras. Cameras like these can easily change film at any point by swapping backs. This makes it simple to change the type of film – e.g. black & white or color – you’re shooting on the go. It also helps keep momentum during a studio shoot, so you don’t have to deal with pauses for film loading. Just keep multiple backs loaded and swap them when you finish a roll of film.

When digital photography arrived on the scene the next evolution of these backs was logical. Take one of those new digital sensors, build it into the case of a film back, and voila! A simple way to turn an analog camera into a modern digital camera. It was an especially relevant development for professional photographers. They usually had a fortune already invested in their existing camera systems and did not want to lose that by starting over with a new digital camera.
The technology they put into these digital backs was cutting edge at the time. While a consumer camera of the era might have 2 megapixels at best, the digital backs got 16 megapixels. And though the sensors are smaller than the 6-centimeter tall negatives the backs were designed for, they’re much bigger than those in consumer cameras. In fact, they’re still bigger than the sensors in professional full-frame cameras now!
My Hasselblad 500EL/M, a ’70s camera in the Hasselblad V system, is one of those cameras with film backs. I love it, but it’s an unwieldy and heavy beast. That’s why it doesn’t get nearly as much use compared to my much lighter Rolleiflex 2.8D camera. But the prospect of using the 500EL/M digitally has always been in the back of my mind. It would give the Hasselblad a very interesting niche in my camera collection!
As the 500EL/M is in the V system, almost all of the accessories made for it will fit and work. This includes modern backs like Hasselblad’s CFV II 50C. It’s a recent digital back that mounts on any Hasselblad V camera, with a 50 megapixel 44×33mm sensor. But digital backs made 20 years ago by brands like Leaf and Phase One will also fit.

Digital backs are an amazing solution for photographers that want to use their classic analog cameras digitally. But the downside? They are also ridiculously expensive. This is true professional photography equipment, with price tags that can rival those of cars. For example, a new Phase One IQ4 goes for a staggering $40.000 – that’s just the back, no camera or lens. Hasselblad’s back is more affordable, with the CFV II 50C selling in a combination with the 907X body for $6.400. But it really gives you an idea of what kind of money we’re talking about – this stuff is not cheap. Even old, used digital backs will go for thousands of dollars.
So this was still not something I really expected to own. And that’s when I stumbled upon an affordable Phase One H20 back on eBay.
Phase One H20 Lightphase

The H20 is one of the earlier digital backs that Phase One made for the Hasselblad V system. It had great specs at launch in 2001 and still holds up decently these days. The back is built around Kodak’s KAF-16801CE image sensor. This big 36.9×36.9mm, 16-megapixel CCD creates 4080×4080 pixel, 16-bit color depth RAW files with 12 stops of dynamic range.
At the time of its launch, an H20 would have cost you about $17.000 – a small fortune. It does make more sense when you consider the target audience for this back was professional photography studios, not hobby photographers like me.
Many photographers who used backs like the H20 nostalgically talk about their image quality online. They’re convinced the low megapixel count combined with the large physical sensor size, CCD technology, and lack of anti-aliasing filter leads to a desirable ‘fat pixel’ look. This ‘fat pixel’ concept gets thrown around a lot when discussing old digital backs. I don’t know if the phenomenon really exists, but fans are convinced the backs are still worth using today.
The Phase One H20 single shot camera back is designed for high-end advertising studios with a need for productivity, flexibility and the absolute best in image quality.
PHASE ONE H20 MANUAL

The big disadvantage of the Phase One H20 is that it’s a tethered back. That means you can’t use the back stand-alone in any way. It always has to be connected to a computer that is running Phase One’s Capture One software. Images captured by the back are not stored internally but sent directly to Capture One. Capture One works similarly to Adobe’s Lightroom, so shooting tethered has the advantage of previewing your images on a full-size monitor.

Phase One designed the H20 for use in studio environments, so this makes perfect sense. But being permanently hooked up to a cable is still a limiting factor. That’s why Phase One also made a line of stand-alone portable backs, the P-series. You can check out these videos by Nathan Hirsch, Hayes Peterson, and Carmine Groe for more details about using the P backs.
Portable backs are very cool, but their versatility also means they have retained much more of their value. The cheapest portable Phase One back for a Hasselblad V camera, the P20, will cost you about $2.000 on eBay. You can find a tethered H20 there, on the other hand, for about $500. A lot of money for a 20-year-old gadget, but easily the cheapest way to make my Hasselblad digital. And that’s really what this is about – if I can get it to work.
Luckily, it turns out someone else tried it before me! A recent Petapixel article reported that Mark Fore bought a Phase One H20 and used it with his Hasselblad 500C/M. His YouTube video doesn’t delve into much detail on how, but at least he proved that it could work. With not much more information to go on than that, I gambled and bought myself an H20.
Important to note if you go searching on eBay: these Phase One H-series backs come in two variations. One is for the Hasselblad V system, like the one we’re talking about here. The second is for the more modern Hasselblad H system. It’s really confusing that the Phase One H-series backs and the Hasselblad H-system cameras share the same letter. But what you’re looking for is a Phase One H back for a Hasselblad V camera.
Setting up the Phase One H20 back
My H20 came in a fairly complete set. I received the H20 digital back with its metal protective cover, a long and a short synchronization cable, a motor cable, a 6-pin FireWire 400 cable, the manuals, and the original software on CD. It was just missing the original viewfinder mask, transport bag, and the lock screwdriver. The ancient software that came on the CD was for Mac OS9, Apple’s operating system from 1999. Did your H20 not come with the manuals or CDs? You can still download the ‘Getting started’ manual here.
Try to make sure you get all of the cables that you need when you buy your back. Replacement cables are very expensive. The motor cable, for example, would set you back $150 if you need one new.

Software

The challenge of using an H20 turns out not to be the software, as I had first expected. To this day, Phase One still supports every digital back they’ve made since the first LightPhase! It’s basically a point of pride for them and I suspect they will keep doing so for the foreseeable future.
Update: Sadly, this is no longer true as of 2022. With the changes Apple has made in MacOS to move to their new ARM-based M1 chipset, Phase One is unable to support their old FireWire backs in new releases anymore. You will need to use a version of Capture One that runs on MacOS Catalina and not go beyond release 14.1.1 of version 21 in order to use a H20 back. Furthermore, plugging your FireWire back into an Apple machine running MacOS Big Sur or later will cause a kernel panic and instant crash. Make sure you do NOT upgrade your machine beyond MacOS Catalina and do NOT upgrade your Capture One beyond version 21, release 14.1.1.
I wrote this article using version 20 of the Capture One application and it supports the H20 just fine. It’s paid software, but as the owner of a Phase One back you can get a free license. You can get it after registering your back in your profile. I did have an issue getting the license automatically because the H20 was too old. If you have the same issue contact support directly and they can fix it for you. Shout-out to Phase One’s excellent support in general!
Hardware
The hardware front, on the other hand, turns out to be more daunting. The H20 has a FireWire 400 (IEEE 1394) port, which was standard for A/V equipment at the time. FireWire 400 was superseded by FireWire 800, a faster generation that came with a new connector design. But even FireWire 800 has long been replaced by Thunderbolt and USB3.0. I don’t think I’ve had any kind of FireWire port on a computer since 2010.


You can buy adapters from FireWire to ports your computer has, but that wouldn’t be enough to operate the H20. Because the back has no batteries, it also relies on the tethered FireWire connection to provide power to the device. And that’s where the problems start… FireWire used to provide a lot of juice back in the days, more than modern computers provide to their ports. An adapter will convert the port for you, but can’t magically generate additional power. The only way to connect an H20 to a modern computer is to provide it with a fully powered FireWire connection. You’ll have to hook it up through some kind of external hub that has its own power supply.
The Phase One knowledge base splits out three scenarios:
- Your computer has a FireWire port, but it does not provide enough power to operate the H20: KA 1211.
- If your computer has a Thunderbolt 1 or Thunderbolt 2 port: KA 1131.
- Or your computer has a USB-C (Thunderbolt 3) port: KA 1208.
Belkin Thunderbolt 2 Express Dock
My late-2015 iMac has Thunderbolt 2 ports, so the second article applies. This article recommends using either powered FireWire repeaters with an adapter or powered Thunderbolt 2 docks that provide FireWire ports. Of the FireWire repeaters that Phase One recommends both the UniBrain and Lindy are still available but get terrible reviews. Multiple users report the devices dying within months of purchase – in some cases within mere days. The Belkin and OWC Thunderbolt 2 docks that Phase One recommends seem like solid performers, but have both been discontinued. To go down this route you’ll have to find a used one.

I bought a refurbished Belkin Thunderbolt 2 Express Dock (F4U055) from eBay, a Thunderbolt 2 dock with a FireWire 800 port. It’s essential that you get model F4U055 specifically, as Belkin sold various Thunderbolt docks that come up when you search. The most confusing wrong model is the Thunderbolt 2 Express HD Dock (F4U085). This one exchanges the FireWire port for an HDMI port, making it quite unsuitable for our purposes. Closely examine the photos of the dock you’re buying and make sure it has the FireWire 800 port.

When you buy the dock, you also need a Thunderbolt 2 cable to connect it. You can still get official Apple cables, but as you can imagine with their legacy products, they’re not cheap. So I hope you still have one, or get one with your dock. Belkin also provides drivers on their F4U055 support page but I had better luck with drivers from the F4U085.
If you have a computer with a USB-C (Thunderbolt 3) port, the Belkin F4U055 may still be your best bet. The OWC Thunderbolt 3 dock that Phase One recommends in KA 1208 has been replaced by a model without FireWire. The older OWC dock is very hard to find on eBay. But according to the same article, a Thunderbolt 2 dock with Apple’s USB-C to Thunderbolt 2 adapter will also work.
FireWire 800 to 400 adapter
So far we’ve gone from a Thunderbolt 2 port on an iMac, to a FireWire 800 port on the dock. Next, we need to go from this 9-pin FireWire 800 connector to a 6-pin FireWire 400 connector. FireWire 400 comes in 2 varieties: 4-pin for devices that did not require power, and 6-pin for devices that did. The H20, for obvious reasons, uses the 6-pin version.
There are two options here: get a FireWire 800 to FireWire 400 (6-pin) adapter and a FireWire 400 (6-pin) cable. This is easiest if you already have a cable that came with your back. Or buy a FireWire 800 to FireWire 400 (6-pin) cable, which has the adapter built-in. That gives you one less failure point in your chain.

In either scenario, you have to make sure you use a cable with a fairly slim FireWire 400 connector. The port on the H20 is deeply recessed and larger connectors won’t fit into the narrow opening. I discovered this when I bought a FireWire 800 to FireWire 400 cable and couldn’t get it to fit.
What ultimately worked for me was a FireWire 800 to FireWire 400 (6-pin) adapter plugged into the Belkin dock. Mine was Delock-branded, but I suppose all of these FireWire adapters roll out of the same factory so you can probably get away with whatever is available to you. Then I plugged the FireWire 400 cable that came with the back into the adapter. The previous owner reported no issues using this cable, and it fits into the recessed port on the H20 perfectly.
Portable hardware options
If you really, really want to shoot this back portable, there are two options. But they’re so convoluted (and yes, that’s saying something considering the above) that I didn’t bother trying them.
Old FireWire-equipped laptops
You could buy an old laptop that has a properly powered FireWire port and tether the H20 to it. While shooting you would put the laptop in a backpack and use the camera Ghostbusters-style, connected to the laptop. But there’s no list of laptops guaranteed to work. Some forum posts say old Apple G4 Powerbooks and iBooks work, others say they don’t. An additional challenge is finding a laptop that’s both old enough and has enough battery life to make this worthwhile. And don’t forget you need to find an old PowerPC-compatible version of Capture One to run on it.

Phase One portable solution
The other option is Phase One’s original IEEE1394 Portable Solution. This is basically a rechargeable battery with a FireWire repeater that adds the required power to a FireWire connector. This would theoretically let you use the H20 tethered to any modern laptop with adapter cables. But they’re very rare, making it hard to find one used – let alone one with functioning batteries. If you want to buy the solution new from Phase One dealers, prepare to pay $795. You could try DIYing a battery solution with similar parts, or using Phase One’s FireWire repeater and power cable. But that wouldn’t be cheap either, and there’s no guarantee your setup would work. Once you add up all these costs, it just makes more sense to look into portable backs instead.
Connecting the Phase One H20 back
So far, so good. We’ve installed Capture One and we have the connectors needed to hook up the back to a modern computer. Now it’s time to hook up the H20 to your Hasselblad camera. My camera is a Hasselblad 500EL/M, the second generation model of the 500-series that came with a motor drive. But it should also work with the 500C/M and other manual models of the Hasselblad V system. They do differ in how you connect them to the H20.


Hasselblad 500C and other manual models
If you have a Hasselblad 500C or other model without a motor drive, you’ll connect the H20 using a synchronization cable. This cable has a coaxial PC plug on one end, and a jack plug on the other. The PC plug goes into your lens’ flash connector, while the jack plug goes into one of the C-connectors on the H20. Sync cables normally synchronize a flash to your shutter, but the H20 reads this signal to capture an image instead.

Hasselblad 500EL and other motor drive models
With a Hasselblad 500EL or other motor drive model, you connect both a synchronization cable and a motor cable. The PC plug goes into your lens’ flash connector, and the jack plug goes into one of the C-connectors on the H20. The motor cable goes from the M-connector on the back to the DIN side socket on the camera’s motor compartment. Make sure you align the red dots/screw on the cables and ports when inserting the motor cable plugs. This additional motor cable lets Capture One control the shutter from software, functioning as a digital shutter release cable.

Tethering to Capture One

Hook up your Belkin dock and FireWire cable to your computer running MacOS Catalina or earlier. Start your FireWire-supporting version of Capture One and plug the other end of the FireWire cable into the H20 back. The red and green lights on the back will turn on, after which just the green lights should remain lit. Capture One will automatically connect with the back and set up tethering. Strangely enough, this also triggers the following error message on my computer:
Tethering, unsupported attribute
Description: Tethering event
Domain:      com.phaseone.captureone
Code:        12
Capture One will do this every time I connect the H20 to my iMac. Why? I have absolutely no clue. But it doesn’t seem to stop the back from capturing images, so I gave up worrying about it.
Now that the back is connected, the camera details in Capture One will populate with your H20 information. You’ll get access to three settings: the ISO (50 or 100), orientation mode, and safe mirror-up. The large circle at the right of this menu functions the same as the Capture button.
Explaining how to use Capture One itself is a bit out of scope for this article, but there’s tons of information on Capture One’s site.
Using the Phase One H20 back
This is where my personal experience starts to diverge from how the H20 is supposed to work. To explain what’s going wrong for me, we need to quickly talk about the back’s sleep/wake behavior for a moment.
Waking up the Phase One H20
The CCD image sensors from this back’s era experience overheating issues when they’re in constant use. To counter this, Phase One designed the H-backs to keep their sensors asleep until the moment they’d take a picture. That means the back requires a wake-up signal before it’s ready to be used. The back can get this wake-up signal in three ways:
- Fire the shutter while the back is asleep and the signal from the lens flash connector will wake it.
- If you use the Capture button in Capture One, it will send a wake-up signal to your back over FireWire.
- And if you’re using a Hasselblad V camera, the back can detect this camera’s release pin. This pin is normally used by the camera to physically check if an attached film back is ready to shoot. The H20 instead uses an optical sensor to wake the back up if it detects the pin entering the back.

After waking up the back, indicated by flashing green lights, the camera is ready to capture an image. You’ll have a limited time window in which you can take your photograph. If you release the shutter in that window, the back will process your image. After a few seconds, it will send it to Capture One with an affirmative beep.
Option 3 lets you use the so-called ‘single-shot mode’, while the other two options are intended for ‘two-shot mode’. ‘Mode’ implies that you can switch between the two, but that’s not really the case. The back always needs two signals to capture an image: one to wake the back, and one to take the shot. The difference is that in single-shot both signals are sent at once, requiring only one activation of the shutter.
Single-shot mode on a Hasselblad camera
Your H20 works in single-shot mode if it’s properly mounted to your Hasselblad V camera as described earlier. When you press the shutter release button, the release pin extends out of your camera body and enters the back. The optical sensor in the back senses this pin and wakes up the image sensor. Mere fractions of a second later the shutter on your lens fires. The PC connector on your lens will send another signal, which goes through the sync cable to your back. Because the image sensor is already awake it takes this second signal as a command to capture an image. After a few seconds, you’ll hear the back beep affirmatively and see the image appear in your Capture One interface.
Fixing single-shot mode
This single-shot mode is great – if it works. My H20 doesn’t function in single-shot mode, probably due to a defective optical sensor. I couldn’t get it working, but my troubleshooting steps might help you.
Phase One’s knowledge base articles KA 1103 points out the most common issue. If it’s not your tether, sync cable, or shutter, you arrive at the release pin. Turns out that the optical sensor for the pin requires a reflection and can’t see the pin if it’s dirty. Older cameras tend to have dark and tarnished release pins. Phase One gives the following advice:

“The inside portion of the pin must be a shiny silver so that the optical sensor inside the back can see it. You can use an emery board or nylon cleaning pad to scape away any tarnish or paint (as displayed above). Alternatively, you can use a silver paint pen to touch up the inside of the pin.”
Try cleaning the pin first. You’ll have to hold the shutter release button to keep the pin extended while cleaning. Be gentle, the pin is attached to a geared mechanism in the body. You don’t want to damage it during the cleaning process.
If the optical sensor still doesn’t see the pin after cleaning, you can try giving it a new reflective coating. Phase One recommends a silver paint pen, which I figure means a silver metallic marker. So I tried using a metallic Sharpie, but that sadly did not improve matters for me either.
Motor drive single-shot mode
Luckily, the defective optical sensor doesn’t mean I can’t use single-shot mode at all. On the 500EL/M, and other models with motor drive, there’s another single-shot option. If you use the motor cable, Capture One’s Capture button will both wake the back and fire the shutter. This does require you to use the button in Capture One instead of the shutter release button on your camera. But as it’s a tethered back, you probably aren’t too far away from your computer anyway.
Two-shot mode on a non-Hasselblad camera
If you have issues with single-shot mode and don’t have a motor drive camera, you can still use the back. You fall back to two-shot mode, which also works if you use the H20 on non-Hasselblads – like large format cameras. This mode is not nearly as intuitive, but it’s also not a showstopper. The H20 manual says:
“To ensure optimal image quality, Phase One strongly recommends shutters that can be fired twice within four seconds. The first release of the shutter activates the CCD, the second release takes the picture. If the time limit of four seconds is exceeded the camera gives a warning “beep” followed by a “ready” signal. If for some reason it is not possible to fire the shutter twice, within the time limit the camera will send a time-out error message to the screen.”

There are 3 ways to use the camera in two-shot mode:
- Take the picture twice (in two shots), like the above quote from the manual. The first shutter release wakes up the back. It will start flashing the green lights, indicating it is ready to take a picture. You’ll have a 4-second window to take your picture, after which the back will give you a warning beep. After the warning, you’ll have another 4-second window. Your second shutter release takes the actual picture.
- Click the Capture button in Capture One on the tethered computer. This will send a wake-up signal to the back, starting the green lights flashing. Again, this gives you two 4-second windows to take the actual picture with the shutter release.
- You can buy a wake-up cable, which is a sync cable with a button to generate a wake-up signal manually. I don’t have one of these, but KA 1260 mentions it as a way to work around two-shot mode. At $90 it’s a bit steep, though.
If you don’t fire the shutter in the time window after the back has woken up, the shot will fail. The back will send an entirely black image to Capture One. If you do fire the shutter in that window, the back will process your image. After a few seconds, it will send it to Capture One with an affirmative beep.
Studio setup for the Phase One H20 back
One major limitation of the H20 back is the available ISO – you’ve got either ISO 50 or ISO 100. That’s… not a lot. This is one of those areas where the technology is definitely showing its age. CCD sensors of the time had trouble going higher than ISO 100 without adding a lot of noise. ISO 100 wouldn’t be too terrible in direct daylight, but with the tethered back, you’re stuck using the camera indoors. Treating it as a studio-only setup and adding additional flash lighting can be a good solution.
If you have studio flashes with a PC connector and you’re already familiar with using them, this part is easy. Just plug your studio flash’s PC cable directly into the F-connector on the back. The back passes the signal from your lens’ flash connector through to the F-connector, which sends it to your flash.
I don’t have studio flashes, but I do have flash experience from my time shooting Strobist-style on Canon DSLRs. Strobist teaches you to use portable Speedlight flashes with wireless flash triggers instead of cables. Connecting my triggers to the H20 is the easiest way to connect my flash gear.

Yongnuo RF-603II Flash Triggers

These are the triggers I already had lying around, but you should be able to use whatever you have. Flash triggers are basically wireless connectors for hot-shoe flashes. This RF-603 system uses identical devices that can function as both transmitters and receivers. One trigger slides into your camera’s hot shoe, then you slide the flash into the hot shoe of the other trigger. Release the shutter on your camera and the triggers will use a 2.4GHz signal to fire your flash. If you have multiple triggers, you can use them to fire multiple flashes at once.
The problem with the Yongnuo triggers is that they’re designed to detect a signal from a hot shoe. But the H20 does not have a hot shoe, just a PC plug (the F-connector). To connect the two we need an adapter.
Kaiser 1301 Flash Shoe Adapter
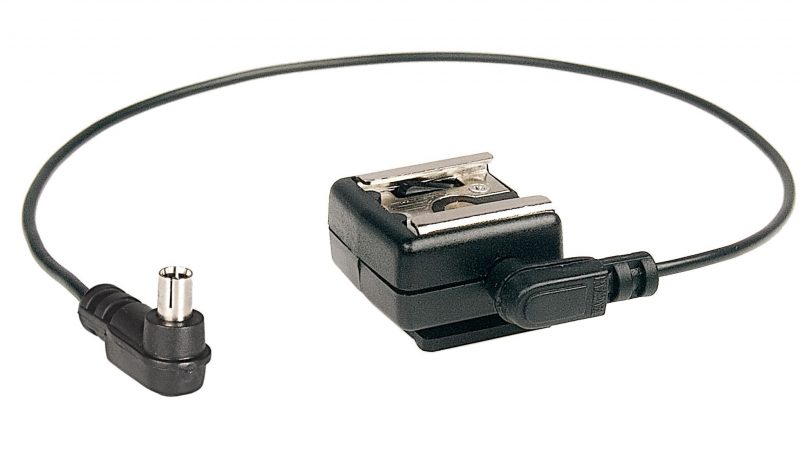
If you need to go from PC to hot-shoe you’ll need an adapter. Just make sure you need them – some triggers can connect directly to the H20 back’s F-connector using a PC cable. You can get various brands of flash shoe adapters from camera websites and Chinese webshops. It’s not a very complicated device, you just need a simple cable that passes through the signal from the PC connector to a hot-shoe mount. I didn’t want to wait for a Chinese webshop to send me gear, so I bought an adapter locally in Europe and got this one from Kaiser, their model 1301.
To use this combination with the H20 I slide my Canon Speedlight flash into the first Yongnuo trigger. I mount this trigger on a light stand, set it to receiver mode, and place it near my subject. Then I plug the cable that comes with the Kaiser adapter into both the Kaiser and the H20 back’s F-connector. The second trigger I slide into the Kaiser adapter and set to transmitter mode. It looks a bit clunky but works remarkably well.

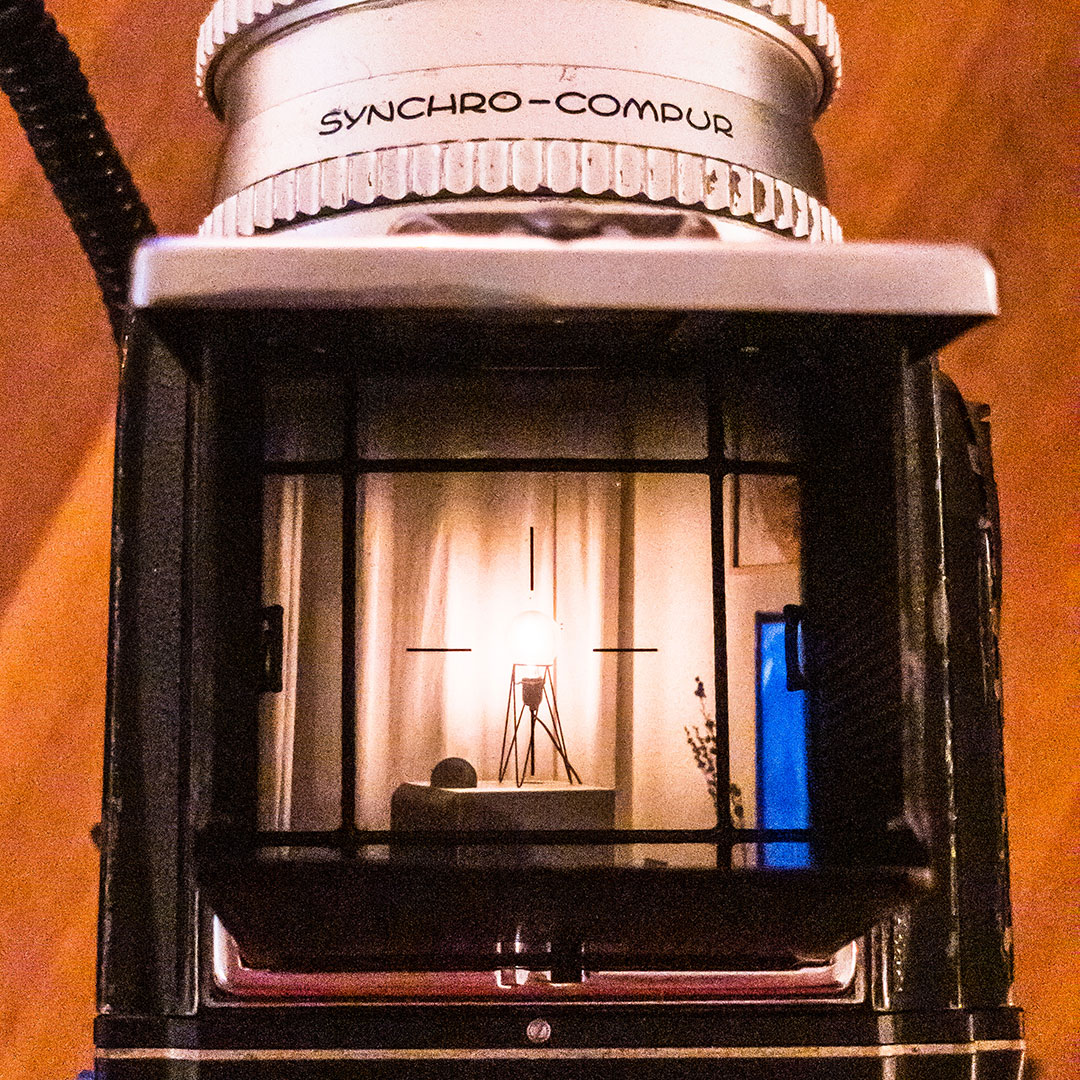
Pre-release (mirror lock-up)
Mirror lock-up is not just a ‘studio’ consideration, it’s relevant in all scenarios where you’ll be using long shutter times. It just happens to be necessary a lot more often when you’re stuck indoors with ISO 100 max.
The mirror in a Hasselblad camera is huge. To take a picture it has to physically swing away, which leads to vibrations inside the camera. This camera shake can introduce a noticeable blur in your shots if you use long shutter times. Hasselblad offers a ‘pre-release’ mode, commonly known as ‘mirror lock-up’, that manually swings the mirror out of the way. You can’t look through the viewfinder when the mirror is up, but the camera will be stable when you fire the shutter. Take a look at the following sample pictures. They’re photos of an identical scene, taken with the same aperture and 1-second shutter speed. But the second image was taken with the camera in its ‘pre-release’ mirror lock-up mode.


The H20 does require you to toggle a software setting to work with pre-release/mirror lock-up. I’m actually not sure what goes wrong when you do not turn this on, but the manual is quite adamant about it. The same warning is repeated three times in the text, leading me to suspect it’s important. So don’t forget to turn on the ‘Safe mirror-up’ setting in Capture One. I just keep it turned on and never turn it off – this doesn’t seem to affect normal operation.
If operating in mirror-up mode, the mirror-up mode has to be set in the Capture One software. This is done on a Mac by pressing Command + M or on a PC by pressing CTRL + M on the keyboard. Avoid using A or AS mode at shutter speeds below 1/15 of a second.
Please note that the Phase One H20 should not be mounted while the camera is set to mirror-up. Also, make sure that the lens is not jammed when connecting the flash sync cable to the Phase One H20.
PHASE ONE H20 MANUAL
3D prints for the Phase One H20 back
An article on my site wouldn’t be complete if we didn’t at least mention some 3D prints. There are two things I want to point out that make it easier to use the H20 on your Hasselblad.
Viewfinder mask
The H20 originally came with a viewfinder mask that you had to place underneath your focusing screen. It masks out the part of the viewfinder that will not be captured by the smaller sensor in the back. Very handy – it’s actually quite a challenge to properly compose shots on your Hasselblad without one. But I haven’t seen any H20 sold with this original viewfinder mask, so I think most sellers have lost them. My H20 did not come with this mask either. You can buy replacement masks, but they’re kind of expensive, so instead I designed one you can print.

The design is based on an existing 6×4.5 viewfinder mask that I copied the outer dimensions from. I modeled the size of the masked area on an acetate replacement mask you can purchase for the H20. You can download my H20 viewfinder mask here. The original viewfinder mask needed to be inserted underneath your focusing screen, but this one goes on top. Take your focusing hood off and put the print on top of your screen. The two notches on the side will clear the retainers that hold the screen in place. Press down on the print slightly to make sure it won’t block the focusing hood. Then slide the hood back in place – done!
Flash shoe adapter

There’s a hidden feature you might not know about your Hasselblad camera. The name tag on the left side, which identifies your camera model, is also an accessory rail. Hasselblad sells adapters that slide over the rail and let you mount things like spirit levels and shoes.
If you already have one this is an excellent way to mount your Kaiser 1301 or other flash trigger system. But if not, it doesn’t make sense to pay $100 for the privilege of having a used but Hasselblad-branded adapter. Instead, you can simply print this accessory shoe adapter. Slide it over the name tag and insert your flash trigger – done!
Phase One H20 samples
So after all that hard work getting the back working, what do the results look like? I still don’t have a full mini-studio set up, so a proper shoot is forthcoming. But my impromptu tests around the living room already show off the potential of this back. Take a look at these samples, each one followed by a 1080×1080 pixel crop to see details:

Living room shelf, daylight 
Living room shelf 1080 pixel crop 
Office building, daylight 
Office building 1080 pixel crop 
My girlfriend, with flash 
My girlfriend 1080 pixel crop 
Liquor bottles, with flash 
Liquor bottles 1080 pixel crop 
Christmas tree, with flash 
Christmas tree 1080 pixel crop 
Dried flower, daylight 
Flower 1080 pixel crop 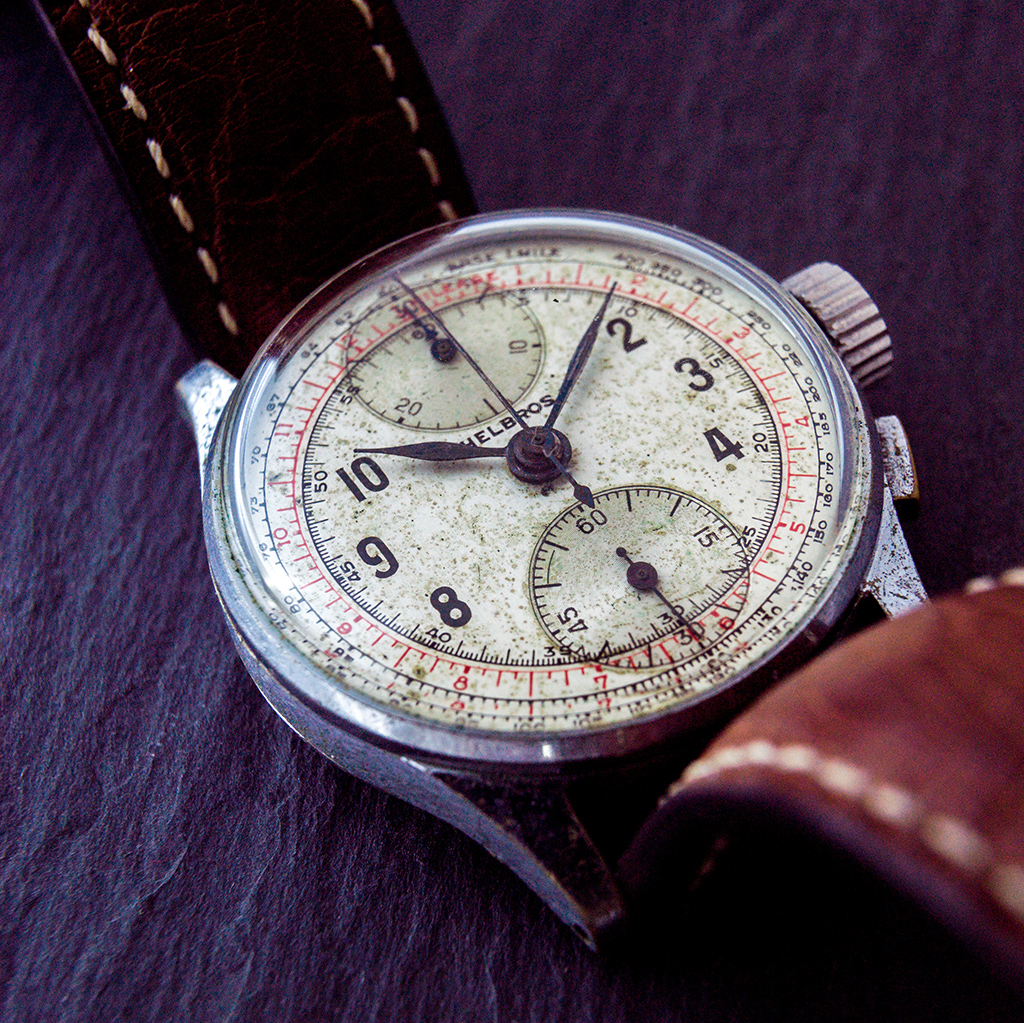
Vintage Helbros watch, with flash 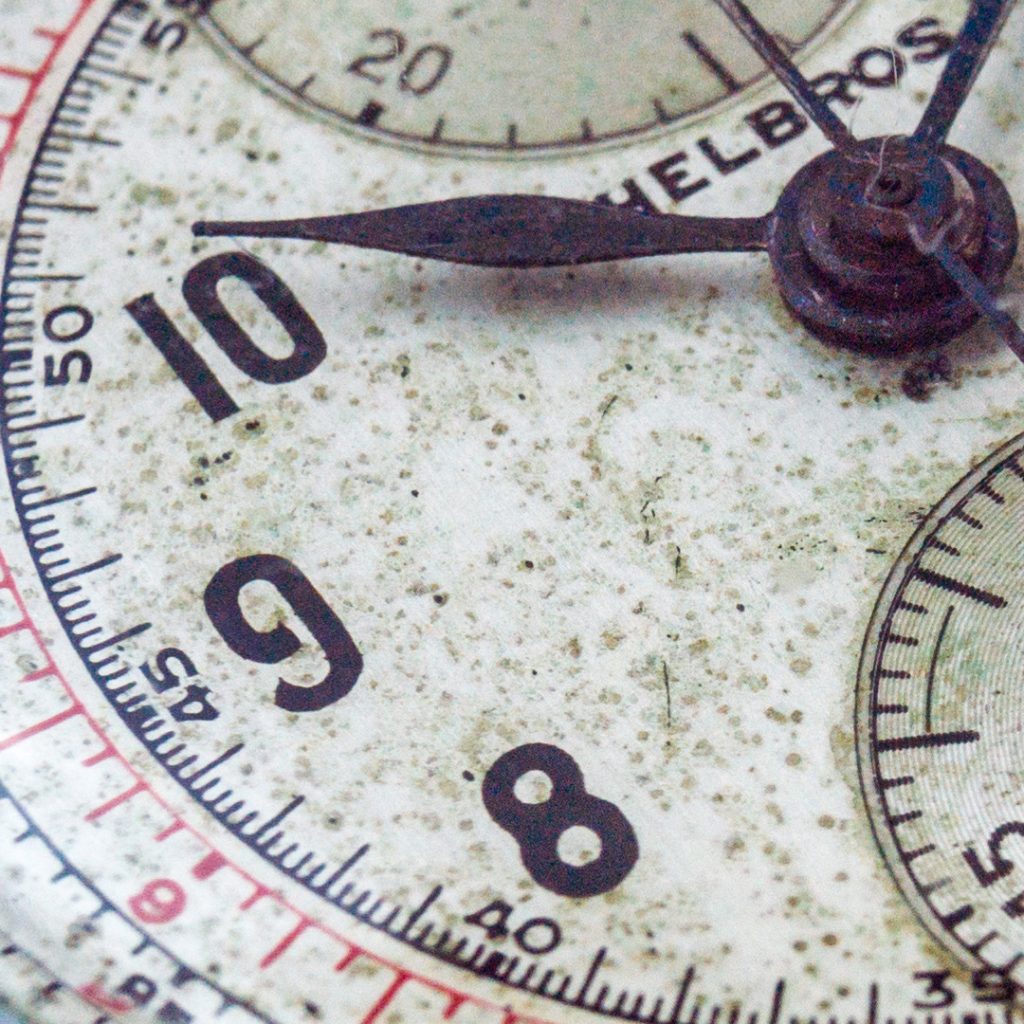
Vintage Helbros watch 1080 pixel crop 
Window view, daylight 
Window view 1080 pixel crop
For more serious examples of the H20 you can also check out Mark Fore’s product shots in his Petapixel article.

Conclusion
So, is the Phase One H20 a viable method to make your Hasselblad V camera digital in the 2020s? Given some caveats, I’d definitely say yes. It’s not an easy device to work with, but your next-best used option goes for about $2.000. A new Hasselblad CFV II 50c goes for $6.400. Unless you have that kind of expendable cash lying around, this is really your only entry-level option. And the results certainly look good enough to work with.
Pros
- Cost. At about $500 used, this is the most affordable way to acquire a digital back for your Hasselblad V camera.
- Image quality. I’m not saying I believe in the whole ‘fat pixel’ theory, but my test shots sure look fine. And the RAW specs are better than that of many cameras released in the past 20 years. Will it outperform a modern professional digital camera? Probably not. But for its age, it doesn’t disappoint.
- Software support.
The software part is easy. Phase One has supported these backs in Capture One for ages now. They’ll probably keep on doing so for the foreseeable future. Other digital backs by different manufacturers from the same era have not had that luck.This is no longer true, sadly. Apple has removed FireWire support from MacOS Big Sur and later and Phase One has been forced to remove FireWire support from Capture One release 14.2.0 onwards. You will need a dedicated machine stuck on Catalina to use this back. - Single-shot mode. Well, theoretically anyway. I can’t get it working on mine, but the native support for Hasselblad V cameras sounds pretty awesome.
- Hasselblad V system. I mean, this is what it’s all about, right? If you have a Hasselblad V camera, this is your way to make it digital. Because who can say no to all that classic Zeiss glass on your Hasselblad? It deserves a chance at going digital.
Cons
- Total cost. Sure, the back’s just $500, but that also means it still costs $500. That’s a lot of money for a 20-year-old piece of digital tech. And you’re probably not done at $500, you still need a FireWire-compatible dock, cables, and adapters. Call it $650 – $700 total? Still cheaper than a P20, but not cheap.
- FireWire port. Permanently tethered, powered FireWire is a bitch to deal with. It’s doable on a Mac, with docks and adapters. But you can’t buy the required docks new anymore, which means acquiring even more used hardware. And I haven’t tried it on Windows, but I don’t think it’s any easier there.
- Tethered back. Compared to a fully portable solution, the tether makes it not particularly versatile. You need to commit to using the camera in a home-studio setup, or you won’t get much out of it.
- Low ISO. I mean, you have a choice between ISO 50 and ISO 100. That’s hardly a choice. You can work around it with fast lenses and flashes, sure, but it’s really where this back shows its age.
- Shooting speed. Compared to a modern camera your fire rate is really slow. There’s the lead time involved with preparing your camera, manual focusing, and setting your shutter and aperture. Then waking up the back and taking the shot. And after each shot, an image takes up to 10 seconds to be processed and transmitted to Capture One. You’ll need a patient model if you’re going to be shooting portraits.
- Software support. As of 2022, the lack of FireWire support in both MacOS and Capture One means it has become exponentially more difficult to use the H20 on a modern machine. You will not be able to buy a new Apple M1-based machine and still use this back.
I know, I know. There’s a lot of cons I’m listing here. But all in all, I’m happy with my purchase and excited to see what I can shoot with it. I think it could be an absolute product/portrait monster with my Zeiss Sonnar 150mm and some proper flashes. I’ll share more serious samples in future articles.
I’m Back MF
Okay, I do need to talk about one last thing. It always comes up when you discuss cheap digital medium format backs: the I’m Back MF. It’s a crowdfunded digital back that was announced in 2019, designed to fit on a variety of medium format cameras. For $499 you’ll receive a back and an adapter designed for your model camera.
Looks good right? An untethered, new back for about as much as an ancient H20 would cost you. But the I’m Back MF works very differently than a back like the H20. There is no huge digital sensor in the back to capture an image. Instead, the adapter functions as a ground glass projection screen for your lens. A tiny image sensor, originally designed for GoPro-like action cameras, captures the image projected on this screen. It does what it promises to do – it gets digital images from your old medium format camera. But if you check their Hasselblad samples, it doesn’t seem close to the H20 in terms of image quality.


You can check out more sample pictures on their crowdfunding site to decide for yourself. Or take a look at this video taken through the Planar 80mm lens on a Hasselblad. It has an interesting vintage look to it – but it’s not the look of the Planar we know and love.
Now don’t get me wrong, I’m not saying you should not get the I’m Back MF. After all, I haven’t tested one in real life, I’m just looking at their samples. And it’s a very cool project to breathe life back in old cameras that would otherwise go unused. But if you’re looking for a digital back that matches the quality your Hasselblad camera is known for, I don’t think the I’m Back is your best bet.
Great write up… thank you for taking the time to lay it all out.
Thanks for your kind comment!
Wat een geweldig stuk en wat een werk heeft daarin gezeten om dit zo gedetailleerd te beschrijven.
Ik sta (stond) op het punt om voort mijn Hasselblad 500 C/M een H20 achterwand aan te schaffen, maar na het lezen van uw artikel ben ik nog wel enthousiast maar in wat mindere mate. Zeker gezien de aanschaf van wat andere zaken. Mijn besluit staat nog niet vast.
Fijn dat het artikel je geholpen heeft! Het is ontzettend jammer dat Apple het onmogelijk gemaakt heeft om deze backs te blijven gebruiken op moderne apparatuur, tot Big Sur kon het prima. Ik ben ondertussen overgestapt op een oude Leaf back die ook op Firewire werkt, maar mobiel gebruikt kan worden met een accu en een CF kaart. Hierdoor is Apple’s besluit geen probleem meer voor mij, want ik kan nu simpelweg de CF gebruiken om foto’s op te slaan en in een kaartlezer aan mijn Mac hangen.
Just fyi…I own a 2012 Macbook Pro and it has a firewire port…
Hey Georg, as far as I had been able to find out from the internet, that generation MBP also has issues providing enough power on the FW port to keep the H20 back running. But I have not tested this myself.
Very nice review – it really summarizes all the tips and tricks needed to make the V system digital and this on a budget!!! Thank you for the pin polishing tip – now my back is properly working on the ELX :)! I cannot stop smiling^^ Best regards from Innsbruck
Thank you Gregor, that’s great to hear! Have fun shooting your ELX 😀
Very nice article and realization …. I have the same setup but I have a problem to get the Capture One 14.1.1 version … I have contacted the Capture One support and they said they don’t support old backs ( mine also is registered there ) …. can you tell me where to get it ? Thanks and congratulations
I’m afraid I don’t know where to get the right version of Capture One anymore Carlos! I have since moved away from using the H20 back as it was made almost impossible to do so with MacOS and Capture One.
Hi Guy Sie, that’s sad to hear about. I continue to use the H25 back with the latest Capture One version 14.1.1.63 for tethering, that supports successfully the back using MacOS Catalina or Ventura on a MacBook Pro 15″ late 2013.
Carlos, it’s also sad to hear they don’t support old backs, for Capture One 14 maybe you have to search on the internet.
Thanks for a great article. I’ve got hold of a P10 back which I’ve successfully connected to my model A1226 (Mid 2007) MacBook Pro3,1. The output from the firewire port on this machine is sufficient to power the back. I’m using Capture One Version 6 which you can get from: https://www.captureone.com/en/account/download#previous. You have to make an account, but once you do that you have access to all the old versions of the software.