Last year I started shooting my first 3D-printed camera, a Goodman Zone. It was soon followed by the panoramic pinhole Goodman Scura and the MPWide, a modified Fuji Instax Wide 300. The MPWide is a mod by the talented Mario, otherwise known as MaxWanderlush. He has been releasing a lot of amazing designs lately. His latest creation is the Ligero, a series of 3D-printed cameras that includes the Ligero69 and the Ligeropress. I’ve shot my first test-roll through the Ligero69 and it works so well for me, I think it’s going to supplant my original Zone completely.
Ligero69 and LigeroPress
Let’s take a look at this new 3D-printed camera. Check out these pics from Mario’s instagram:

That is one sexy camera. At its core the Ligero is a replacement for the massive Mamiya Press camera body. This heavy camera from the ’60s was designed for professional photojournalists, and could probably deflect an incoming bullet or be used as a blunt melee weapon. Mario created the Ligero series as a lightweight, compact body alternative compatible with Press lenses and backs. The Ligero69 takes both Mamiya’s Press lenses and the roll film-backs. Alternatively, you can build the Ligeropress which takes Mamiya’s Polaroid-compatible packfilm backs instead. The difference between a Mamiya Press body and a Ligero body? About a full kilogram of weight.
Like many of his other designs, Mario had made the files for his Ligero series of cameras available for download. You can create your own if you have a 3D-printer! If you don’t, or don’t want to deal with the hassle, you can also buy finished Ligero bodies from him.
Ligero versus Goodman Zone
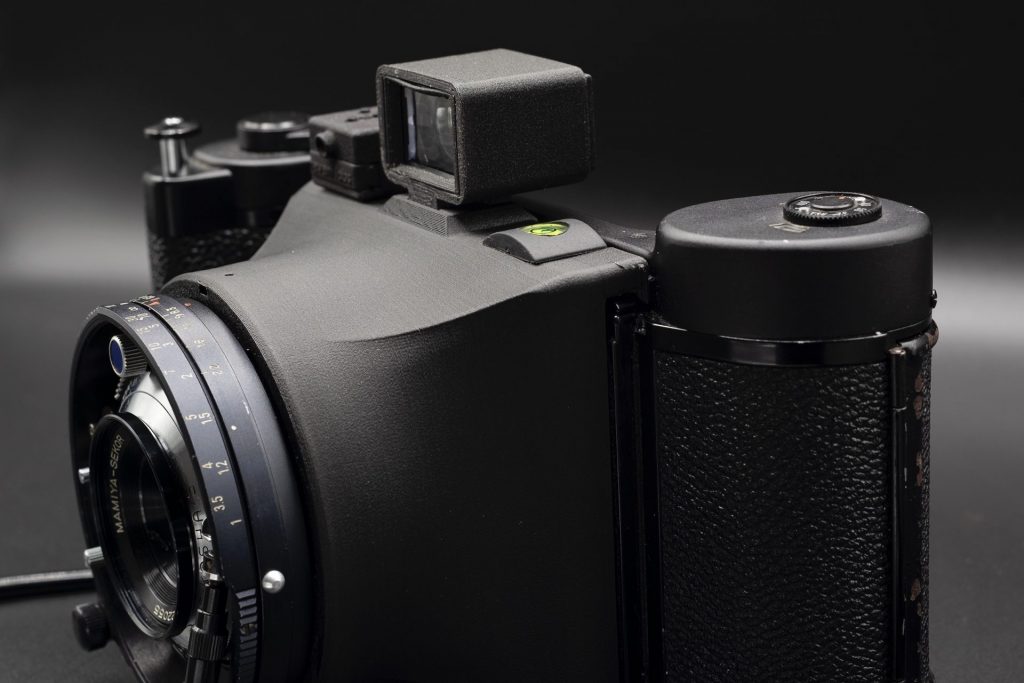
Now, the Goodman Zone is not too different an idea from this Ligero. It uses the same Mamiya Press lenses, though it combines them with Mamiya’s RB67 film-backs instead. The design philosophy behind both cameras, however, couldn’t be more different. The boxy Goodman Zone is designed to provide a ton of attachment points around the body. You can customize your camera to your heart’s content with grips, mounts, etc. If you want a double-handgrip camera with five flash shoe points, there’s nothing stopping you from making it.
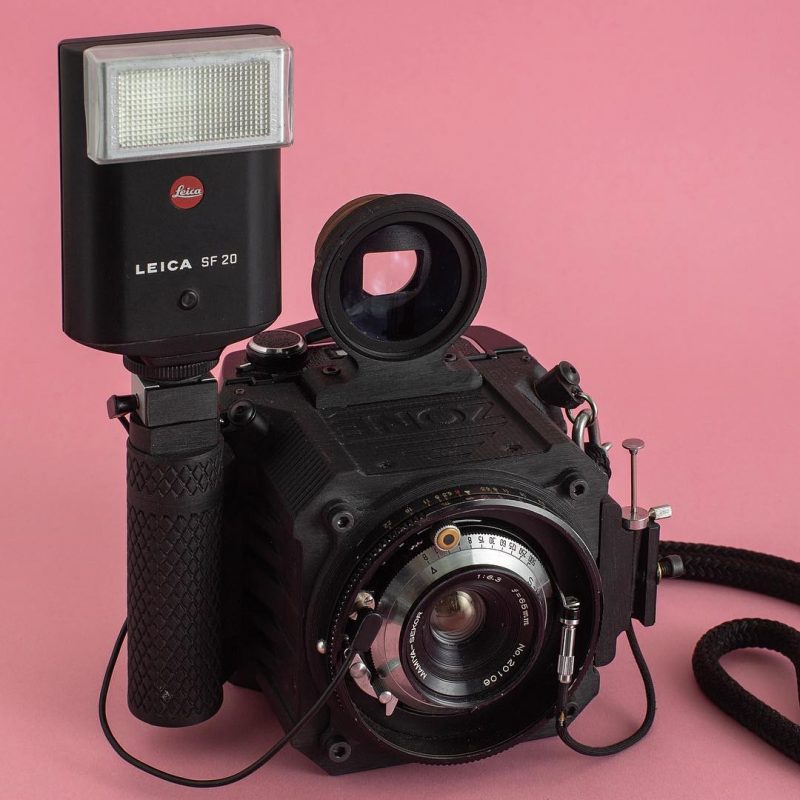
The Ligero, on the other hand, is a well-designed plastic cone. The elegant shape takes up no more space than required to mate the Press lens to the film-back. There’s room for a tripod screw on the bottom and three cold shoes on top. But that’s the only space you have to mount accessories. By disposing of extraneous customizability, the Ligero is simpler and has fewer failure points than the Zone. Mario wrote an article on 35mmc detailing his thoughts behind its creation.
What do we really want? Everyone is looking for something different. Me? Whatever it was, I wanted it to be as close as possible to the Mamiya Universal Press, except at a fraction of the size and weight.
Mario M.
Its ability to mount Press backs also means the default negative size of the Ligero69 is, as the name implies, the big 6×9 format. This means every shot taken with the Ligero69 gives you a massive 9 centimeters by 6 centimeters negative. 6×9 is the same aspect ratio you get while shooting a normal 35mm camera, but it’s a good 5 times as big. Some people consider 6×9 the gateway drug to large format photography, and once you’ve held one of these negs in your hands you understand why. Not to disparage the 6×7 negatives the Zone shoots, but the difference between the two is more than a full 35mm negative.
In the end, I enjoyed using my Goodman Zone, but the camera has also been plagued by light leaks that I wasn’t really able to nail down and fix. The clunky way you had to override the RB67 film-back to advance the film wasn’t a favorite either. The Ligero looked like it would elegantly solve all of my issues with the Zone – while still using parts that I already owned.

Ligero accessories
I printed my Ligero69 in black Colorfabb nGen, a PETG-like material that holds up well to high temperatures and mechanical stress. My favorite Mamiya Press lens, the 65mm f/6.3, and an early model K film-back are easily mounted to the print. This K film-back has none of the advanced features of the later Press film-backs but has the advantage of being the lightest of them all.

The big switch from a Mamiya Press body to the Ligero is adapting to the loss of the rangefinder. The rangefinder is the focusing mechanism, part of what makes the Mamiya Press so heavy. The Ligero – like all 3D-printed cameras – has no focusing aids, forcing you to find an external solution. This can be a laser rangefinder, an optical rangefinder, or even just good old guessing. For the Goodman Zone, I had already bought an optical, Soviet-era, Blik external rangefinder. You can find it for about $20 on eBay and they work well enough when combined with a suitable lens and a stopped down aperture. It works fine on the Ligero too.
The Ligero also doesn’t have a viewfinder. I got an external viewfinder with the 65mm lens that comes in handy now. There are options to build your own viewfinder to match the lens of your choosing, but this viewfinder is already matched to my lens. It also saves me the hassle of taking apart a cheap camera to reuse its viewfinder. Because of the size of both the viewfinder and rangefinder, I mounted them on top of each other. Ugly, but functional!
The last accessory I added is the cable release grip. This clips onto the model K film-back and holds a shutter release cable. This cable trips the lens remotely and gives me a shutter release button in a natural position near my dominant hand. The alternative is tripping the shutter directly on the lens, which tends to result in some camera shake during the shot.
All these accessories make my Ligero bulkier than Mario’s original vision – especially the massive Mamiya viewfinder and the asymmetric Blik mounted on top of it. But they do make it an easier camera to work with. I may try to find a more compact viewfinder and rangefinder in the future to replace this combination.
Sample images
I shot my first Ligero test-roll over the Christmas holidays but didn’t get around to developing it until late this month because of the COVID lockdown. It’s a roll of black & white Fomapan 400 in 120, but I forgot to meter it as an ISO 200 film – most people agree that Fomapan is not truly 400 speed. My shots came out very underexposed and I had to crank up the brightness in Negative Lab Pro to get some detail back. But that’s user error and not something I can blame the Ligero for. In fact, considering how good the test results are, I’m pretty sure that the Ligero69 is a perfect camera for me.

All the test shots are from the area around the Utrecht railway station. The Dutch railways’ national headquarters were here, and several prominent historical buildings in this area were built around the turn of the last century to accommodate them. The Tulpenburgh was their second administrative office, dating back to 1895. I love that we accidentally captured a gull flying through the frame here.

The station area is a key part of Utrecht’s urban renewal plans, which focus on modernizing the inner city and cementing its role as a public transportation hub for the entire country. New modern housing surrounds the renovated station, filled with apartments created specifically for commuters who take the train every day. Or at least, when we’re not working from home during a global pandemic, anyway.

A brisk walk away from the train station is the Vrouwe Justitiaplein, the square of lady justice, where you’ll find Utrecht’s courthouse. The large building in the background of this shot is the Inktpot, another office built specifically for the Dutch railways. The 65mm Press lens translates to a 28mm lens on a 35mm camera, and you can really see the wide view this lens lets you capture here.

The railways built the Inktpot – inkwell – after World War 1 when resources were scarce across Europe. No worries, though. They just took matters into their own hands and bought 2 brick factories, a wood mill, 3 ships, and an entire forest in the province of Limburg. All of that went into the Inktpot, creating the largest brick building in the Netherlands.

The largest brick building in the country demands a brick test-shot to check detail. And there’s definitely no shortage of detail in this shot. I wish I could show you the 6×9 negative directly, it’s absurd how sharp this is. The combination of the Ligero with the Mamiya Press lens gives me nothing to complain about.
All in all, not bad for a first test-roll. No leaks, proper focus, everything seems to work as expected. Like what you see? It’s really easy to join the fun; you just need to print your own Ligero and buy a Press lens and film-back. If you’re interested in more 3D-printed photography gadgets, come join us! You can find a whole bunch of 3D-printed camera designers and users at the Filament & Film discord (formerly the Goodman server).