IKEA has released some interesting new products lately, focused on air quality. In this product line, one unit that stands out is the VINDRIKTNING air quality sensor. This cheap (just €9,99) sensor measures the air quality in your home, using a simple traffic light scheme to alert you. Green means the air is fine, orange means okay-ish, and red means it’s bad. Cheap, simple, what’s not to love? Well – it is a dumb sensor. And if you’re into smart homes like me, you want a smart sensor. But you’re in luck. Some people in the Home Assistant community have figured out how to modify the IKEA VINDRIKTNING so it can talk to Home Assistant via ESPHome! In this guide, I’ll explain how you can modify your own.
Full disclosure: As of 2025, I am an employee of the Open Home Foundation, the non-profit that owns and governs Home Assistant. This blog post was written before I started working there. My opinions on this blog are my own and do not reflect the views of the foundation. Any recommendation of products here is of a personal nature and does not signal approval by the foundation.
Particulate Matter
So, why do we even care? Well, air quality matters. You’ve seen the pictures of smog-filled cities, a haze of pollution covering the streets, and you instinctively know you don’t want to get that into your lungs. This pollution consists of what is called ‘particulate matter’ (PM). The American Environmental Protection Agency (EPA) has the following to say on the subject:
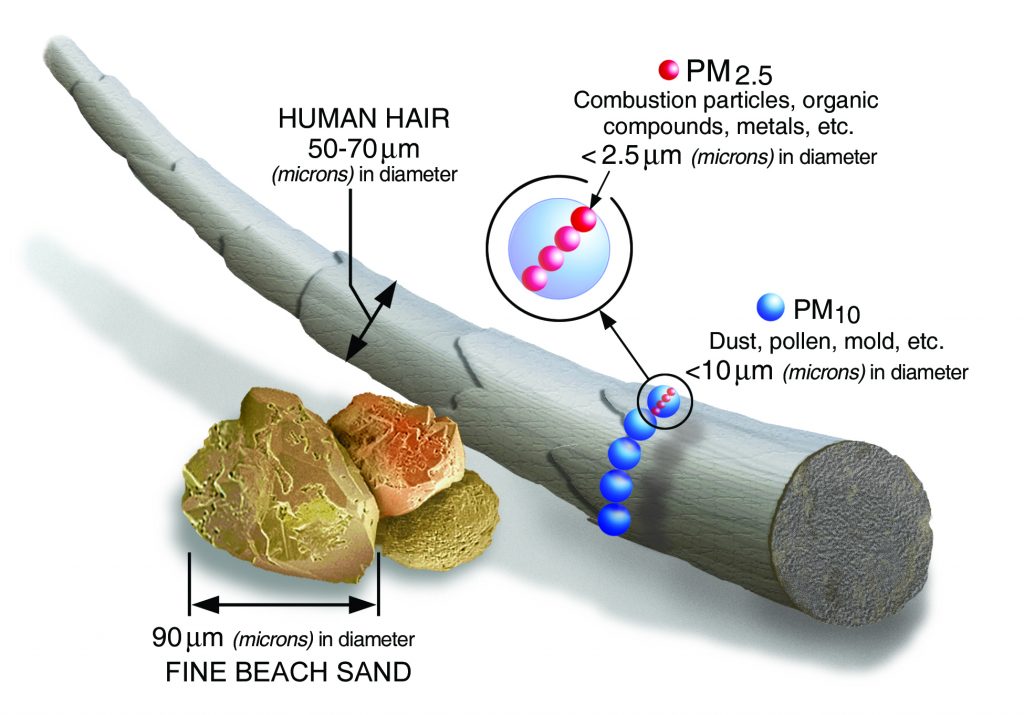
“Particulate matter contains microscopic solids or liquid droplets that are so small that they can be inhaled and cause serious health problems. Some particles less than 10 micrometers in diameter can get deep into your lungs and some may even get into your bloodstream. Of these, particles less than 2.5 micrometers in diameter, also known as fine particles or PM2.5, pose the greatest risk to health.”
Enviromental protection agency
So it turns out, it’s not just the visible smog you should be worried about. Tiny particles that you can’t see can still be drifting through the air – and they’re bad for you too. If particles less than 10 µm in size pose a risk to your health, it makes sense that you want to measure how much is in the air. That’s exactly what the IKEA VINDRIKTNING does – it has a Cubic PM1006 sensor module that uses infrared light to measure particles in the air. When the infrared light shines on particles, those particles will reflect light back towards the sensor. The sensor measures the intensity of the reflected light to calculate how much particulate matter is drifting through your air.

Now, there is a bit of a snag between IKEA’s product description and the actual sensor used in the VINDRIKTNING. The PM1006 is designed to detect particles ranging from 0.3 µm to 10 µm – which means it can detect PM2.5, as that falls in the range, but the actual range is that of a PM10 sensor. But both Cubic and IKEA market this as a PM2.5 sensor, which would indicate it only detects fine particles of 2.5 µm and smaller. It doesn’t seem to quite add up. Now, either way, particles between 0.3 µm and 10 µm particles are bad for you. For an affordable €10 you can know how much of it is in the air. I figure it’s still worth it. But I just want to make clear, at the onset, that I think this sensor might not be quite as specific as IKEA says it is.
RECTIFICATION (Updated January 20, 2022): It appears that the Cubic PM1006 and the PM1006K are two different models sensor. The link (and datasheet) I referred to earlier is for the PM1006K and does not apply to the PM1006 that is actually in the VINDRIKTNING. The PM1006K does have 3 sensor outputs for PM1, PM2.5 and PM10 and covers the entire range from 0.3 µm and 10 µm. The PM1006, on the other hand, only has one for PM2.5 so you can put your worries to rest. See this discussion on the Home Assistant community for more information.
Anyway, the VINDRIKTNING lights up like a traffic light to indicate the current air quality status. If there’s 0 to 35 µg/m3 PM10 in the air, the traffic light is green. For 36 to 85 µg/m3 the traffic light becomes a warning orange. And at 86 µg/m3 and over, the traffic light becomes a please-open-a-window red. Now – how can we go beyond the traffic light and get the actual numbers into Home Assistant?
Connecting the IKEA VINDRIKTNING to Home Assistant

The base work to getting this sensor talking to Home Assistant was done by Hypfer, who developed this ESP mod and wrote the first code for this purpose. It was a stand-alone version that used the MQTT protocol to communicate, but Habbie then took the idea and adapted it for ESPHome. Since we can run ESPHome as an add-on in Home Assistant, this is the perfect way to mod this sensor for our use! A recent post on the Home Assistant forum sums up the current state of the project.
The mod itself is quite elegant: instead of hacking the insides of the VINDRIKTNING apart, we just add a tiny ESP8266 board. This board taps into the signal sent by the sensor module and sends it to Home Assistant over WiFi. This way we don’t actually control the VINDRIKTNING itself, but whenever the sensor normally takes a reading we’ll receive that same number in Home Assistant.
That also means this modification is the simplest ESPHome project I’ve ever done. You only need an IKEA VINDRIKTNING, an ESP8266 board, and 3 wires to connect the two. To fit into the VINDRIKTNING case I would recommend the WeMos D1 Mini board, which is tiny enough to fit without modification. You can also get (cheaper) D1 Mini boards from other producers, but I’ve had connectivity issues with off-brand Minis before. So far, the ‘official’ Lolin D1 Mini boards have been the best in my experience. You’ll also need some cables to solder – I cannibalized some cheap 10cm breadboard jumper cables I got in an electronics starter kit. You can also buy proper DuPont cables or any other suitably short electronics cables.
VINDRIKTNING configuration in ESPHome
For this post, I won’t go over the installation of ESPHome in your Home Assistant setup. ESPHome has an excellent guide on their website that takes you through all the basics, and there’s plenty of YouTube tutorials on the subject.
Create a new sensor in ESPHome by hitting the big + in the bottom right. You’ll be asked to name your sensor and fill in your WiFi SSID and password. In the next screen, you have to select your boards. In our case, this is a WeMos D1 Mini, but you may be using another board. Once you’ve selected your board, ESPHome will generate a basic template for your configuration with some default settings set up.
Now we just have to add a little bit of code to load support for the PM1006 sensor, tell ESPHome which pin we’ll solder the VINDRIKTNING to, and register this output as a sensor in Home Assistant. That bit of code looks like this:
# Ikea Vindriktning PM2.5 sensor
uart:
  rx_pin: D2
  baud_rate: 9600

sensor:
  - platform: pm1006
    pm_2_5:
      name: "Ikea Vindriktning PM25"
      filters:
        - sliding_window_moving_average:
            window_size: 10
            send_every: 10
Note: The code above assumes you’re on version 2021.8.0 or higher of ESPHome. From this version onwards it contains the code for the VINDRIKTNING sensor. If you have not updated to this version of the add-on yet, you can still load the necessary code as an external component by also adding:
# External component until final merge
external_components:
  - source: github://sermayoral/esphome@pm1006
    components: [ pm1006 ]
The code also contains a suggestion from RubenKelevra to implement a filter that reduces the total number of measurements the VINDRIKTNING sends. This ‘sliding window moving average’ filter averages every group of 10 measurements and sends only that value to Home Assistant, reducing the noise in your graphs.
Copy the code you require and paste it into your template – you’re done. Because we’re using a WeMos D1 Mini, we use the D1 Mini’s markings in our code here, specifically: rx_pin: D2. If you’re not using a D1 Mini, the pin you’re going to use may have another name on your board. Replace D2 with whatever GPIO on your board you’re going to use.
In the end, your configuration file should look something like this, except with your own wifi details and passwords in the various fields:
Save your code, then hit the Install button on this project’s card in ESPHome. Now, pick an installation method and just follow the instructions to get your board ready for use. I usually pick connecting the board to my Home Assistant server via USB cable, which is the most stable option. Once ESPHome has uploaded the binary to your board you can build it into the VINDRIKTNING.
IKEA VINDRIKTNING modification guide
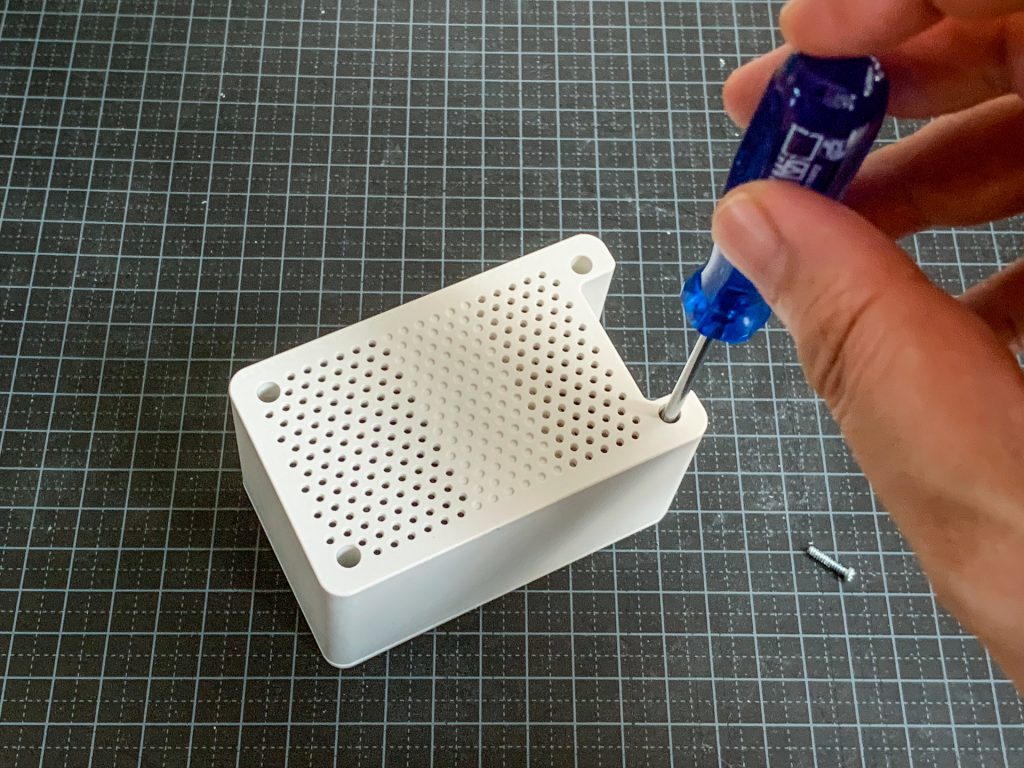
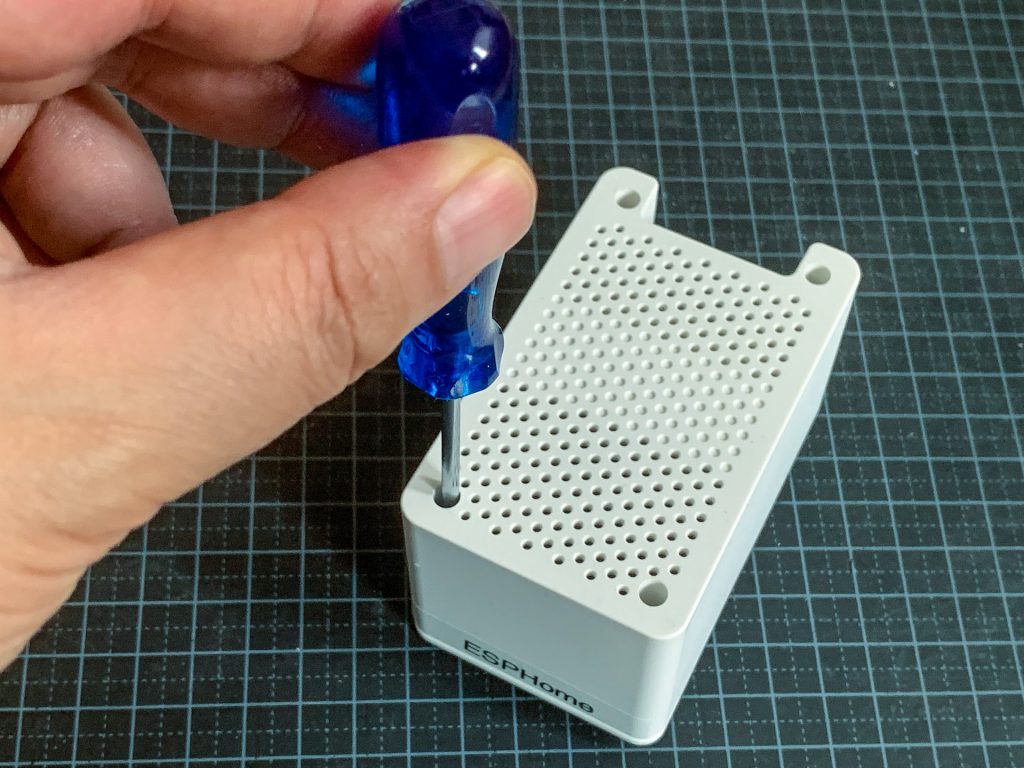
Time to get hacking! First, we open up the IKEA sensor. It’s pretty easy: There are just 4 screws holding the front on. Use a long electronics Philips head screwdriver to open it up.
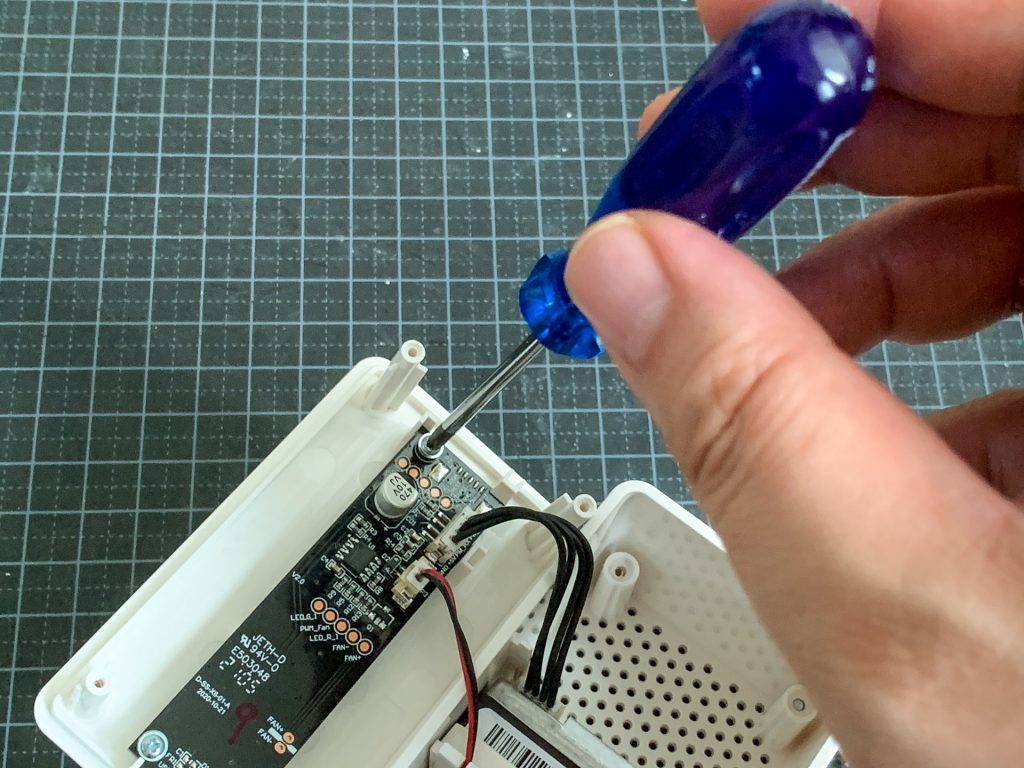
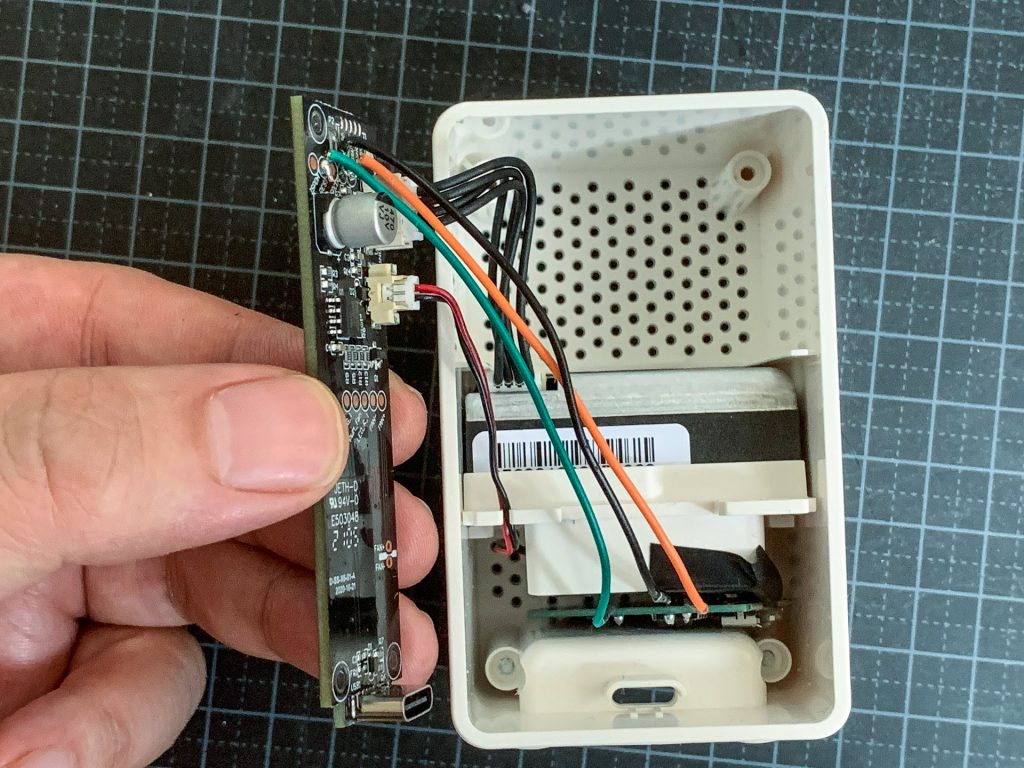
With the sensor opened up, the inner workings of the VINDRIKTNING are revealed. There’s a small PCB board screwed into the front panel, with wires leading to a small fan (2 wires, one red, leading to it) and to the actual sensor module (4 black wires leading to it).

Unscrew the 3 screws from the PCB to pop it loose from the front panel for easier access.
With the PCB free, you’re ready to start doing some soldering. If you want even easier access, you can also disconnect the wires leading from the other components to the PCB. But I kept the wires connected, as they weren’t really in the way.

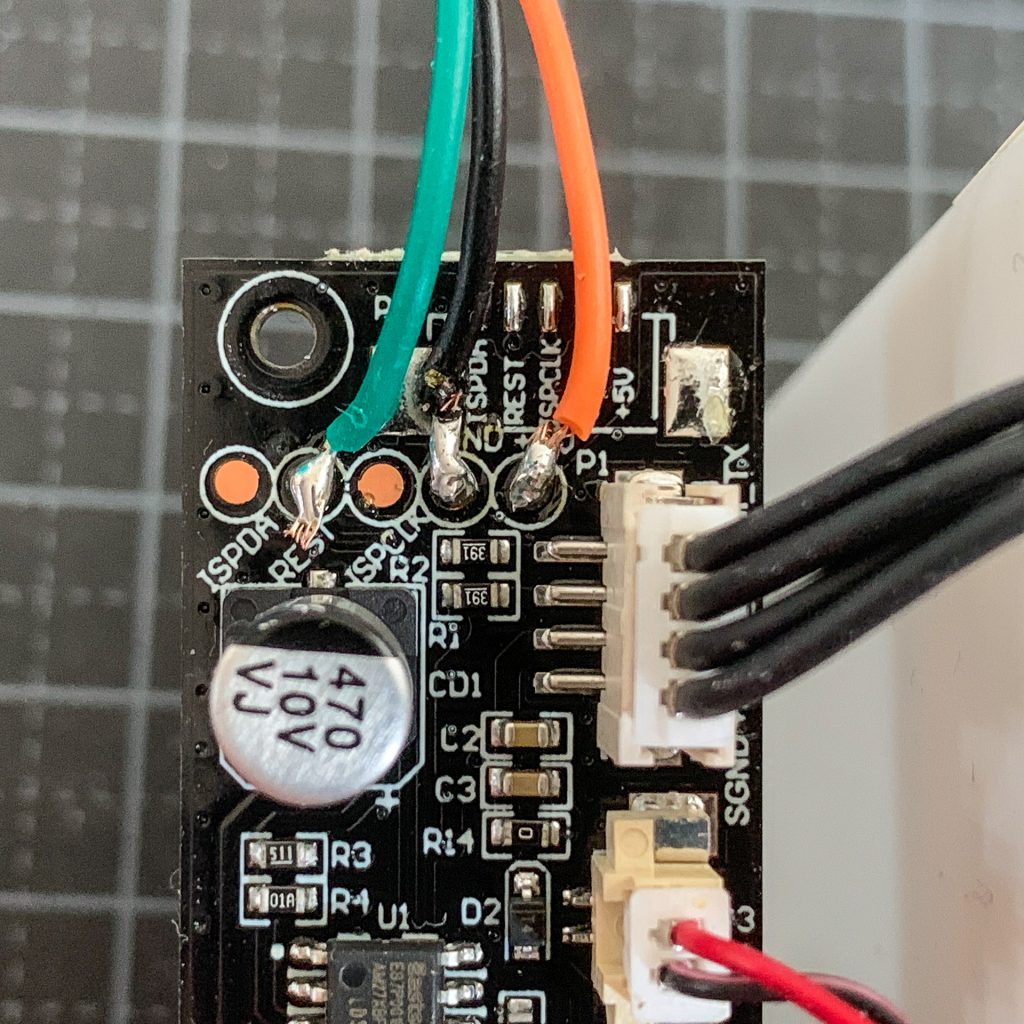
There are 5 round, copper, test pads at the top of the PCB. These are normally used to test and diagnose problems with the PCB, but we’re going to use them to connect our Wemos D1 Mini board. We need to solder 3 wires to the PCB: 5-volt power, ground, and the sensor signal. These go to the test pads marked +5V, GND and REST on the PCB respectively.

These wires will lead to the Wemos D1 Mini board as follows:
- The wire from the VINDRIKTNING’s
+5Vpad goes to the D1 mini’s5Vpin. - The wire from the VINDRIKTNING’s
GNDpad goes to the D1 mini’sGNDpin. - The wire from the VINDRIKTNING’s
RESTpad goes to the D1 mini’sD2pin.
If you’re not using a Wemos D1 mini the markings on your board will be different, but you can use any GPIO (General Purpose Input/Output) pin available on your board. Just go back and modify the ESPHome code to match the name of your pin. The choice for the D2 pin is also arbitrary – as long as you program it right in ESPHome, you can use any GPIO.

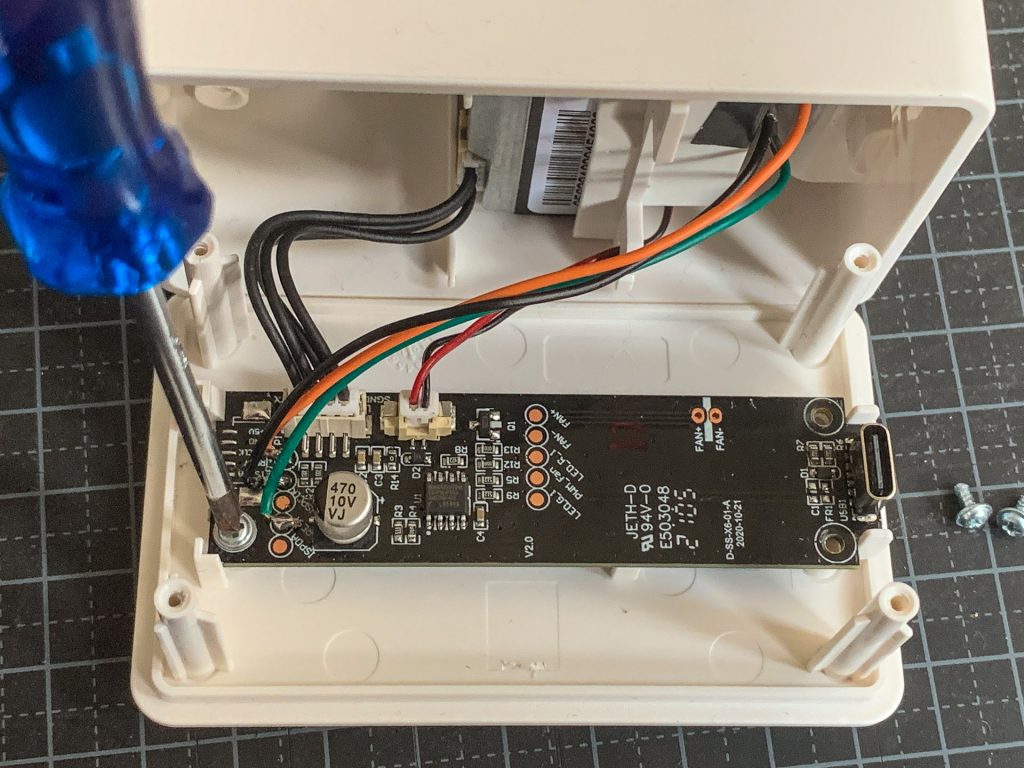
It’s a pretty doable job, you just need to solder 6 points in total. I removed one end of a 10cm jumper cable to solder the wire directly to the PCB test pads, and then inserted the remaining pin end of the wire into the Wemos D1 Mini to solder into the hole. Once soldered I clipped the pins on the other side of the board. Once you’re done the result should look like this:

Honestly, I apologize for my shitty soldering job, but I think this proves that if I can do it, so can you 🙂
OPTIONAL MODIFICATION (Updated October 26, 2021): The fan noise of the VINDRIKTNING can become annoying because the fan is turned on briefly by the PCB every time a measurement is taken. The start-stop behavior makes the fan noise irregular and noticeable in a quiet room – though many people say they don’t hear it over the background noise of their other devices. If you’re like me and you do hear the noise, this mod by jjansen85 will help. It makes the fan less audible by cutting the red wire of the fan and then soldering that red wire to the 3V3 pin on the D1 mini. This changes the fan from 5 volts to 3.3 volts which means it will run slower and make less noise. The slower fan speed will influence the VINDRIKTNING’s measurements a bit, but probably not enough to matter. The fan does still start and stop as measurements are taken, but the noise will be inaudible.

To perform this mod, we have to solder 1 additional point. Cut the red wire that goes from the fan to the PCB as close to the PCB connector as possible. Then take this red wire and solder it to the 3V3 pin on the WeMos D1 mini instead.
Now, let’s take a look at the spot where we’re going to fit the WeMos board. There’s just enough room between the fan and the USB-C port for it to squeeze in. If you’re worried about the screws on the fan shorting your board, cover them with a bit of electrical tape to isolate them. In this build, I taped the front screw but figured nothing important on the WeMos would touch the rear screw. Drop the WeMos into the gap and it should look a bit like this:

We’re in the home stretch now. You could physically hot-glue the WeMos to the case at this point, but I’m still in the experimentation phase and may have to disassemble this build repeatedly. So instead, the WeMos gets to rattle around inside the case. With the WeMos board in place, we start putting it all back together. The 3 screws reattach the PCB to the front panel.
And then the 4 screws put the front panel back onto the case. Make sure you screw these in tight and the panel sits flush against the case. If it’s loose, you’ll find your USB cable won’t fit snugly and the sensor will be prone to rebooting randomly as the cable wiggles.
Hook it up to USB power. If you’ve done everything correctly, you’ll see the LEDs on the front start to pulse between the three colors for 10 seconds. After that, the sensor is booted up and it will settle into the color matching your air quality.

Log back into your Home Assistant installation. From the Configuration menu, you should now be able to go into Integrations to discover and add your new VINDRIKTING sensor. It’ll show up as a device and entity underneath the ESPHome card. Add the new entity to your Lovelace UI via your favorite sensor chart (I’m a fan of mini-graph-card).
Congratulations! You’re done!
Our experience using the IKEA VINDRIKTNING

The sensor has been running steady for two weeks now and it’s quite interesting to see the data for our apartment. So far, we’ve mostly been in the green area of the range. The air quality seems to be pretty okay here in the Netherlands. The only time the VINDRIKTNING is put to the test is when we’re cooking. Frying things in a pan releases a lot of particles, and they spread through the room fast. That’s logical, it’s why your house smells so good when you’re cooking something yummy. But it also means a lot of particulate matter is filling up that air you breathe and we should open up a window.
Usually, these aren’t bad peaks – the light might go red and our sensor will say we’re at about 100 µg/m3. But we had one ‘incident’ when we were going to sear a carefully prepared piece of sous-vide steak. Sous-vide meat needs to be seared as fast as possible, on the hottest temperature you can manage. So, we made a cast-iron frying pan as hot as possible on our furnace and seared the steak on it for 1 minute total. The VINDRIKTNING threw a fit: we weren’t just in red territory, we hit the peak value of 1000 µg/m3 – the sensor can’t go any higher than that. It wasn’t wrong either – there was definitely a smoky haze in our apartment.
If you want to use the same card as we do, we’ve added our YAML in this gist. You’ll have to install mini-graph-card. Additionally, we use sensor.nightstate to shade nighttime in this card – details can be found here on how to set this entity up.
Automating the IKEA VINDRIKTNING
We haven’t really started using the sensor in any automation yet, but the possibilities are definitely there. If you have an air purifier in your home, you could start it automatically if the VINDRIKTNING senses a lot of particulate matter in the air (in fact, people have already done this with an IKEA air purifier). Or, you could compare the current air quality in your house with the current air quality outside, and send you a notification to open the window when the air outside is better. Even better, if you have automated ventilation, you could start actively pumping outside air into your house. If you have any more ideas on how we could automate this, don’t hesitate to leave a comment!
Is “Our VINDRIKTNING chart after normal cooking” graph a nicely configured mini-graph-card? If so, could you share the YAML, please?
By the way, was very easy to follow instructions and be up and running 🙂 Thanks. Btw, before I bought this thing, I googled around whether I will be able to integrate it within home-assistant.
Thanks for your kind words! I’ve added the YAML of this minigraph to a gist in this blogpost, near the image of the card :).
Great hack and easy to do. I have added the sensor to a nodeMCU and it works great with home-assist. What I really like, is that you get more details (actual numbers instead of a range).
Good one. I also found an advanced modification of VINDRIKTNING. That guy added some extra features and enhances the functionality of this sensor way far. Watch https://youtu.be/BSLXqhjjSZI
Very cool, did this and works well. Can we expose the three different ranges as this guy did, https://github.com/its-vccground/Vindriktning/blob/main/README.md
but using the esphome setup? I guess we’re what were seeing is the average of the three?
Thanks Marcus! I wondered how he managed to do that and I asked on the HA forum this afternoon. Apparently the PM1006 sensor in the VINDRIKTNING only supports PM2.5 officially. Tasmota firmware is interpreting 2 other data field as the PM1 and PM10, but this is done on an assumption that has been said is wrong by Cubic, so this is not reliable sensor data. Their PM1006K sensor does offer PM1, PM2.5 and PM10. But that one is not the sensor IKEA put in the VINDRIKTNING. See:
https://community.home-assistant.io/t/ikea-vindriktning-air-quality-sensor/324599/264?u=guysie
Further info here https://github.com/pulsar256/vindriktning_esphome, seems the unit send out three reading!
This was excellent tutorial, thank you very much!
[…] Inspiratie voor dit artikel komt van deze blogpost. […]
I added an MH-Z19b sensor to the D1 Mini UART and stuck it in the box, so now I have C02 plus PM25 monitoring in one device. Once I got a hold of the sensor, it was just a matter of soldering four more wires and adding the config to esphome.
Hi, I try to enter the config on the ymal in esphome (HA) but I get this error in your code
ERROR Error while reading config: Invalid YAML syntax:
mapping values are not allowed here
in “/config/esphome/esphome-web-7b3e06.yaml”, line 37, column 11:
pm_2_5:
^
# Ikea Vindriktning PM2.5 sensor
uart:
rx_pin: D2
baud_rate: 9600
sensor:
– platform: pm1006
pm_2_5:
name: “Ikea Vindriktning PM25”
filters:
– sliding_window_moving_average:
window_size: 10
send_every: 10
Same happened to me. Turned out it was some weird formatting issue but didn’t look like it as I’d copied it directly. Try copying into a notepad and then into your code as it might had hidden characters.
[…] and humidity monitors. They send their data using MQTT over bluetooth. From there, I hacked an IKEA VINDRIKTNING air quality monitor; now I can see how the air quality changes when cooking or using the open […]
[…] DIY: Use an IKEA VINDRIKTNING air quality sensor in Home Assistant with ESPHome […]
Excellent writeup, thank you very very much. I had found the original walk-through on Github, but your photos are FAR superior, and you do a great job of spelling everything out for n00bers like me!
[…] IKEA / DIY […]